WHAT IS
3D RAD?
CLICK HERE
TO FIND OUT!
TextPrint

The TextPrint object allows you to display text in your 3D Rad projects. Character size, color, transparency and kerning are definable. Text alignment and multiple lines are supported.
Add the TextPrint object to your project and launch the simulation to render the text.
If the TextPrint object is linked to a camera in the Object List, run-time it will be rendered into the viewport for that camera only. This is typically useful when you add split-screen functionality to your projects.
To customize the text, stop the simulation and double-click the TextPrint item in the Object List to open the following property dialog:
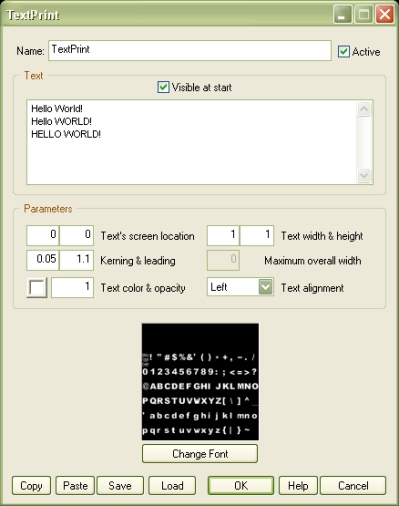
The text to print can be typed in the big input box.
Visible at start. If this option is unchecked, the text will only be shown when the TextPrint object is shown by another object, like for example EventTimer.
Text's screen location. The screen center is at 0,0. Left/right margins are at -16 and 16. Top/bottom margins are at 12 and -12. Note that the actual text-block position depends on alignment (see below).
NOTE: don't forget that you can visually set the text location by clicking and dragging the mouse in the Virtual Editor window, without opening the property dialog every time.
Text width & height. Any size is allowed for the characters, but values bigger than 2.0 may affect rendering quality.
NOTE: don't forget that you can visually set the text size by right-clicking and dragging the mouse in the Virtual Editor window, without opening the property dialog every time (you can stretch the text by right-clicking and dragging while holding the [Ctrl] key pressed).
Kerning & leading. These are the space between printed letters and the offset between text lines, respectively.
Maximum overall width. If Center is used for alignment, you can also specify the maximum width for the printed text-block, in screen units. Total screen width is 32.
Text color & opacity. Click the color button to open the color picker. Opacity must be between 0.0 (invisible) and 1.0 (fully visible).
Text alignment. This setting uses the vertical line passing through the Text's screen location point (see above) as a reference.
The first step is duplicating the
C:\3D Rad\3DRad_res\
objects\TextPrint\data\default
folder. Give the cloned folder a proper name (eg MyFont).
Duplicate the
C:\3D Rad\3DRad_res\
objects\TextPrint\data\index\default.jpg
file and give it the same name as the cloned folder (eg MyFont.jpg).
Open the existing fonts.dds file in the
C:\3D Rad\3DRad_res\
objects\TextPrint\data\MyFont
folder, by using any paint software supporting the .dds file format.
Modify the character images and save the .dds file back.
In the property dialog for the TextPrint object you can now click the Change button and double click the new skybox thumbnail.
The .wid file in the data folder specifies the relative width of each character in the set. You can use a text editor to adjust the values for your custom font.
For advanced modifications, please keep in mind that the .x files in the data folder can also be edited. They are 3d models (simple quads really) that use the fonts.dds file as texture.
You can replace them with any other 3d model in .x file format, as long as they all use the fonts.dds texture.
You can remove the .x files belonging to characters that are not present in your custom font. This will make font loading faster for your 3D Rad projects.
The following internal parameters can be accessed by using event objects like EventOnValue or Script: