WHAT IS
3D RAD?
CLICK HERE
TO FIND OUT!
EventOnLocation
This object starts/stops (or shows/hides) objects linked to it when an object enters or exits a definable volume (box).
For example, you use this object to play a sound effect or stop a timer when a racecar crosses a waypoint.
This object can itself be started and stopped by other event objects, allowing you to create chains and achieve articulated event management.
For more about event objects in general, please see this tutorial.
Add the EventOnLocation object to your project, link it to all the objects you want to monitor for volume crossing and also to all objects you want to start/stop when the condition is met.
You link objects together in the Object List (left side of 3D Rad main screen), by selecting an object and then checking the other objects you want to link to it.
The volume is rendered as a cube you can stretch (scale), rotate and place anywhere, in the Virtual Editor.
To configure the EventOnLocation object, double-click it in the Object List to open the following property dialog:
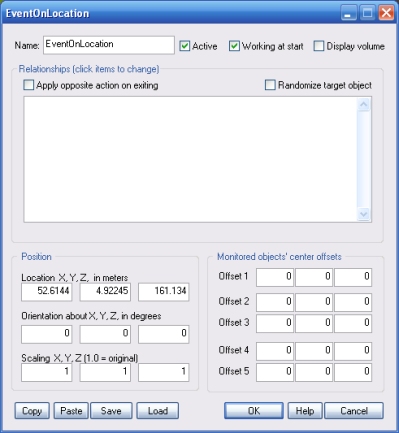
If this option is checked, the volume is also rendered run-time, usually for debug purposes.
This list defines how the EventOnLocation object relates to the objects that are linked to it. The following relationship types are supported:
The check is based on a reference point on the object, defined as a relative offset from the object's model center.
For example, assuming the offset from the model's center is a point on the front bumper of a car, this point on the car bumper will still be the reference point when the car moves or rotates.
Up to 5 different point locations can be defined (see Object's center offsets section) and each monitored object can use one.
If this option is checked, the specified action is applied to the target on entering the detection zone, and the opposite action is applied to the target on exiting the detection zone.
This feature can be used, for example, to start a looping sound when an object enters a zone and stop the sound when the same object exits the zone.
Note that this feature only works for monitored objects that are marked, in the Relationships window, as CHECK FOR ENTERING (OFFSET 1/2/3/4/5).
If this option is checked, the specified action is applied to one target object only, picked randomly. If the option is not checked, the action is applied to all target objects instead.
If this option is not checked, the EventOnLocation object will not work until it is started by using another event object.
The EventOnLocation object's detection zone can be 'cloned', run-time. This means that you can create/destroy unlimited detection zones run-time, with one single EvenOnLocation object in the project.
Creation/destruction/positioning of zone-clones (also called imposters) can be achieved by using iObjectImposter...() script functions or the Imposter object.
The cloned zones work like the default zone, as an 'extension' of it. That is, the action is triggered when the monitored objects enter/exit the main zone or any of its clones.
You can optionally specify a SkinMesh object to visualize where imposter detection areas are created, and also optionally remove the detection area imposter (and its SkinMesh, if any) as soon as one of the monitored objects enters/exits the imposter area.
For an example of usage of EventOnLocation imposters, please see the demo project called EOLImpostersDemo.3dr.
The following internal parameters can be accessed by using event objects like EventOnValue or Script: